Autofill From Android App
Bitwarden makes your passwords available for autofill so that you can seamlessly log in to websites and apps while also maintaining strong and secure passwords. Autofill cuts the copying and pasting out of your login routine by detecting vault items that match the service you are logging in to.
note
On Android, Password Manager uses a website (e.g. https://gmail.com) to autofill in web browsers and a package name (e.g. com.google.android.gm) to autofill in installed applications.
When it comes to installed applications, it is important that you only install and autofill into applications from trusted sources, like the Google Play Store or F-Droid, as a malicious application could mimic the package name of a well-known application. Learn more.
Set up autofill
Depending on the version of Android your device is running, there are a few different ways to enable autofill from Bitwarden. To set up autofill:
Navigate to Settings → Autofill.
Tap Autofill services to allow Bitwarden to use your saved login information to sign in to apps on your device.
When your device asks for your preferred services for passwords, passkeys, & autofill, choose Bitwarden.
Back on the Bitwarden Settings → Autofill screen, choose one of the following Display autofill suggestions options:
Inline: This option will suggest credentials to autofill in your keyboard.
Popup: This option will suggest credentials to autofill in a popup over the input field.
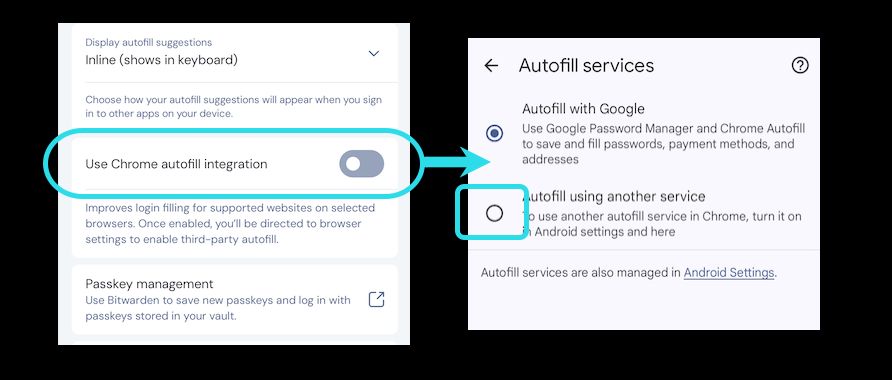
If you use Brave or Chrome as your web browser, toggle the Use Brave autofill integration or Use Chrome autofill integration options to ensure that autofill will work in these browsers. Learn more below.
note
These options will disable the browser's built-in autofill functionality.
If you want to use Quick-action tiles, toggle Use accessibility on. When your device takes you to the Accessibility menu, toggle Bitwarden on in that location as well.
tip
Quick-action tiles do not require that the Autofill service is toggled on in Bitwarden, meaning you can skip the previous steps if this is your preferred method, however you will need to edit your tiles using the icon to put the Bitwarden tile options in a place that makes sense for you.
note
Having problems? Refer to our guide on troubleshooting Android Autofill. If you are still not able to get autofill on Android working, contact us.
List of autofill methods
Inline
This method (requires Android 11+ and a compatible IME (input method editor)) will suggest credentials to autofill in your keyboard:
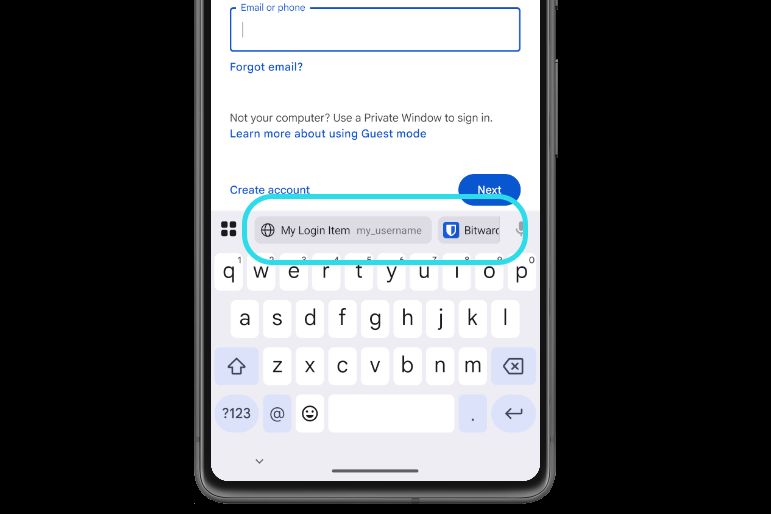
If you're not seeing suggestions, check whether the keyboard (IME) you're using supports Inline.
Popup
This method (requires Android 8+) will overlay a popup when the device is focused on an input that has a matching login item. When your vault is unlocked, you'll be provided the options to immediately autofill or to open your vault:
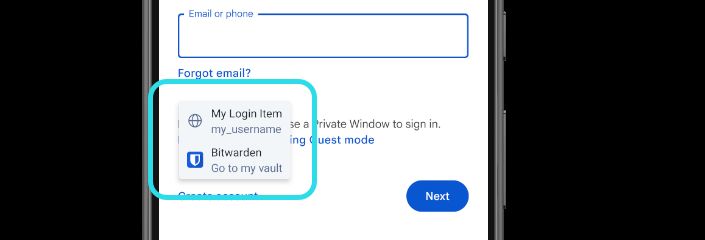
You'll be presented with two options. The first (above, My Login Item) will autofill the first login (above, my_username) with a matching URI. The second (above, Bitwarden) will allow you to choose from a list of logins with matching URIs.
Browser integrations
If you use Brave or Chrome as your web browser, toggle the Use Brave autofill integration or Use Chrome autofill integration options to ensure that autofill will work in these browsers. Doing so will take you to that web browser's settings, where you will also need to enable the option to use a third-party service. This is required due to the way these browsers are set up on Android, and requires that Autofill services is enabled in Bitwarden.
note
These options will disable the browser's built-in autofill functionality.
Quick-action tiles
Quick-action tiles use the Android accessibility service to make autofill actions available from your notifications pull-down's settings menu. Quick-action tiles do not require that the Autofill service is toggled on in Bitwarden, however you will need to edit your tiles using the icon to put the Bitwarden tile options in a place that makes sense for you:
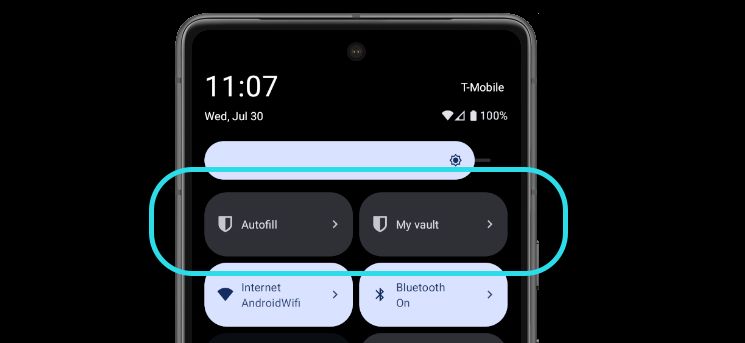
To use a quick-action tile, navigate to the page or app you want to autofill and, swipe down to access the tiles, and tap the tile you want to use.
Switch accounts during autofill
If you are logged in to more than one account, your mobile app will default to trying to autofill credentials from the currently active account. You can switch from one account to another during autofill by tapping the avatar bubble.
Using passkeys
Setup Bitwarden for use with passkeys
Once the Bitwarden application is updated to the latest version, go to Settings → Autofill and tap Passkey management to access the Android settings to configure Bitwarden as your passkey provider.
warning
In order to activate Bitwarden as your preferred passkey provider it may be necessary to:
For Chrome users:
Navigate to
chrome://flagsand select Enabled for 3rd party passkey providers under Android Credential Management for passkeys. Depending on what version you're using, this option may be unavailable or activated by default. For best results, update to the latest version.
Disable and re-enable Bitwarden as your autofill provider once updated to the latest version.
Reboot your phone after changing the above settings.
Remove any passkeys stored in Google Password Manager, as Android will preference this provider (be sure not to delete any important passkeys that will result in lockout from an account).
Please also note that Android does not allow 3rd party passkey providers like Bitwarden to support passkey-based 2FA (a.k.a. "non-discoverable credentials"); Bitwarden-stored passkeys can only be used as a primary login credential.
Create a passkey
When creating a new passkey on a website or app, the Android application will prompt you to store the passkey:
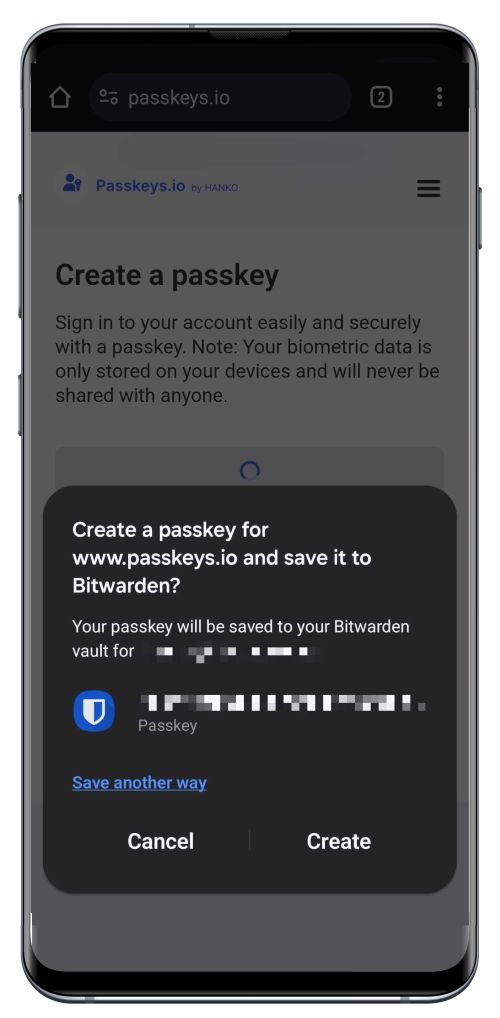
Select Create.
note
Select Save another way if you do not wish to store the passkey in Bitwarden or More saved sign-ins to sign in with a passkey not stored in Bitwarden.
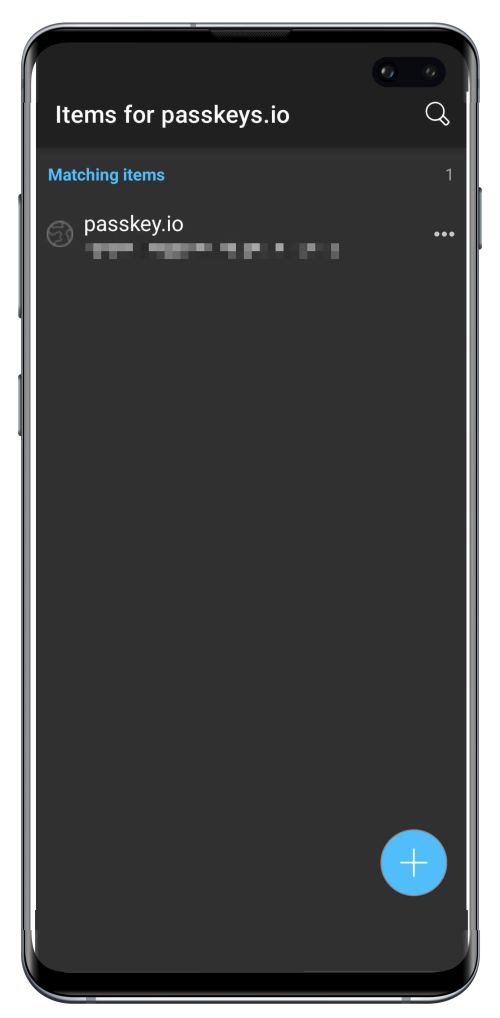
If a passkey already exists for this service, Bitwarden will allow you to save a new passkey by selecting the icon to create a new item, or by overwriting an existing passkey:
note
Only one passkey can be saved per login item. If a credential is saved in multiple places, for instance as two separate login items in the individual vault and organization vault respectively, a different passkey can be be stored with each login item.
Sign in using a passkey stored in Bitwarden
To use a passkey stored in Bitwarden, initiate the passkey login on the website. The mobile app will provide an option to login using the passkey stored in your Bitwarden vault:

Select Sign in to use your passkey.
note
Select Save another way if you do not wish to store the passkey in Bitwarden or More saved sign-ins to sign in with a passkey not stored in Bitwarden.