Create a Send
Anyone can create text Sends, but file Sends can only be created by premium users or members of a paid organization (families, teams, or enterprise). Choose the Bitwarden app you want to Send from to get started:
To create a new Send from the web app:
1. Select Send from the navigation.
note
This view will list Sends that have not reached their deletion date. Like the Vaults view, you can filter your Sends by selecting one of the available Types.
2. Select the New Send button:

3. On the New Send dialog, specify the following:
What type of Send is this?: Choose whether this Send will be Text or a File:
Type | Steps |
|---|---|
Text | Type or paste the desired text into the input box. Toggle the When accessing the Send, hide the text by default option to require recipients to toggle visibility when they open a Send. Sends may not exceed 1000 characters encrypted. When saved, the character count of a Send's text is increased due to encryption, meaning that an 700-character Send will scale to ~1,000 characters when it comes into contact with Bitwarden, triggering this error. As a rule of thumb, character counts will grow between 30-50% when encrypted. |
File | Select the Choose File button and browse for the file to Send. The maximum file size per Send is 500 MB (100 MB on Mobile). (Requires Premium & Verified Email) |
Name: Choose an identifiable, meaningful name for this Send.
By default, a Send is scheduled for deletion seven days from its creation. You can change this and other options using the Options menu (see Step 4), otherwise select Save to finish creating your Send.
4. Select the Options menu to configure the following options as needed:
Option | Description |
|---|---|
Deletion date | The Send will be permanently deleted on the specified date and time. By default, seven days from creation. The maximum allowed value is 31 days from creation. |
Expiration date | The Send will expire on the specified date and time. |
Maximum access count | The Send will be disabled after the specified access count is reached. By default, unspecified. |
Password | Require a password to be entered by recipients of this Send in order to gain access. |
Notes | Enter private notes for this Send, which will only be visible to you. |
Hide my email address from recipients | Hide your email from Send recipients. |
Disable this Send so that no one can access it | Check this box to prevent this Send from being accessible to any recipients. You will still be able to interact with this Send from your Send view. |
tip
The rest of this section covers copying a send link to your clipboard, but you can do that automatically by checking the Copy the link to share this Send to my clipboard upon save option before you click Save.
Once you are happy with your Send, select Save to finish.
Once your Send is created, use the Options menu and select the Copy Send link button to copy the generated link to your clipboard:

Once copied, share your Send link with intended recipients however you prefer. Sends are end-to-end encrypted, so you don't need to worry about exposing any data to whatever intermediary communications services you use.
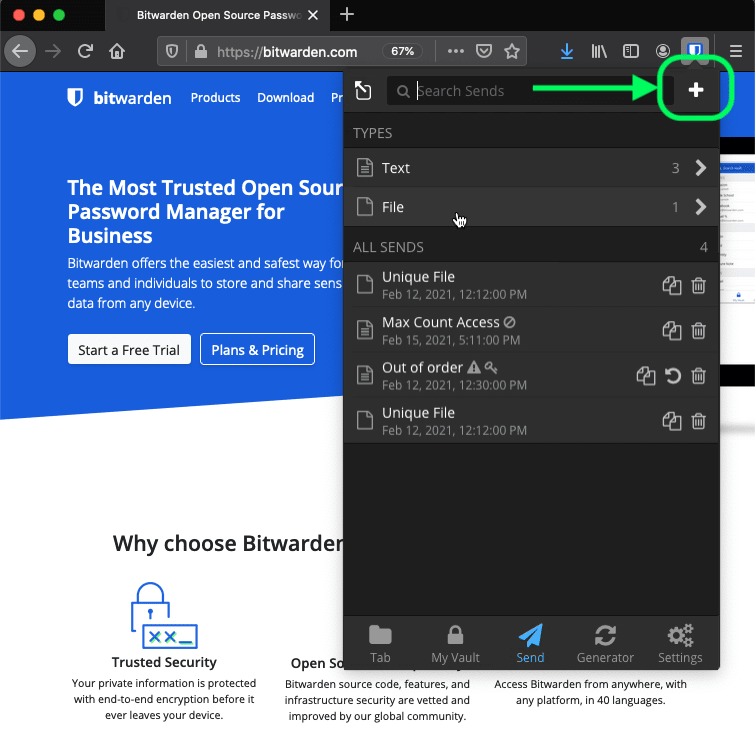
To create a new Send from a browser extension:
1. Select the Send tab.
note
This view will list Sends that have not reached their deletion date. Like the Vaults view, you can filter your Sends by selecting one of the available Types.
2. Select the Add icon:

3. On the Add Send view, specify the following:
Name: Choose an identifiable, meaningful name for this Send.
Type: Choose whether this Send will be Text or a File:
Type | Steps |
|---|---|
Text | Type or paste the desired text into the input box. Toggle the When accessing the Send, hide the text by default option to require recipients to toggle visibility when they open a Send. Sends may not exceed 1000 characters encrypted. When saved, the character count of a Send's text is increased due to encryption, meaning that an 700-character Send will scale to ~1,000 characters when it comes into contact with Bitwarden, triggering this error. As a rule of thumb, character counts will grow between 30-50% when encrypted. |
File | Select the Choose File button and browse for the file to Send. The maximum file size per Send is 500 MB (100 MB on Mobile). (Requires Premium & Verified Email). |
By default, a Send is scheduled for deletion seven days from its creation. You can change this and other options using the Options menu (see Step 4), otherwise select Save to finish creating your Send.
note
To create a send while using the Firefox or Safari browser extension, you must open the extension in the side bar or select the popout button.

4. Select the Options menu to configure the following options as needed:
Option | Description |
|---|---|
Deletion date | The Send will be permanently deleted on the specified date and time. By default, seven days from creation. The maximum allowed value is 31 days from creation. |
Expiration date | The Send will expire on the specified date and time. |
Maximum access count | The Send will be disabled after the specified access count is reached. By default, unspecified. |
Password | Require a password to be entered by recipients of this Send in order to gain access. |
Notes | Enter private notes for this Send, which will only be visible to you. |
Hide my email address from recipients | Hide your email from Send recipients. |
Disable this Send so that no one can access it | Check this box to prevent this Send from being accessible to any recipients. You will still be able to interact with this Send from your Send view. |
tip
The rest of this section covers copying a send link to your clipboard, but you can do that automatically by checking the Copy the link to share this Send to my clipboard upon save option before you click Save.
Once you are happy with your Send, select Save to finish.
Once your Send is created, select the Copy Link icon to copy the generated link to your clipboard:

Once copied, share your Send link with intended recipients however you prefer. Sends are end-to-end encrypted, so you don't need to worry about exposing any data to whatever intermediary communications services you use.
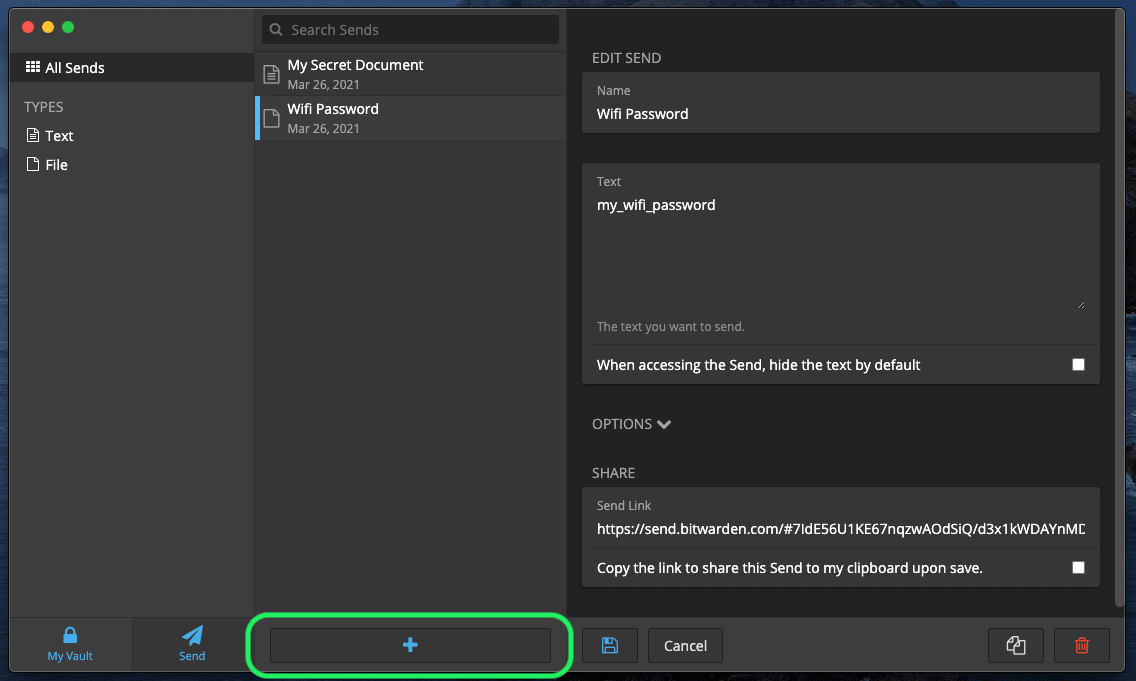
To create a new Send from a desktop app:
1. Select the Send tab.
note
This view will list Sends that have not reached their deletion date. Like the Vaults view, you can filter your Sends by selecting one of the available Types.
2. Select the Add icon in at the bottom of the center column

3. In the right-most column, specify the following:
Name: Choose an identifiable, meaningful name for this Send.
Type: Choose whether this Send will be Text or a File:
Type | Steps |
|---|---|
Text | Type or paste the desired text into the input box. Toggle the When accessing the Send, hide the text by default option to require recipients to toggle visibility when they open a Send. Sends may not exceed 1000 characters encrypted. When saved, the character count of a Send's text is increased due to encryption, meaning that an 700-character Send will scale to ~1,000 characters when it comes into contact with Bitwarden, triggering this error. As a rule of thumb, character counts will grow between 30-50% when encrypted. |
File | Select the Choose File button and browse for the file to Send. The maximum file size per Send is 500 MB (100 MB on Mobile). (Requires Premium & Verified Email). |
By default, a Send is scheduled for deletion seven days from its creation. You may change this and other options using the Options menu (see Step 4), otherwise select Save to finish creating your Send.
4. Select the Options menu to configure the following options as needed:
Option | Description |
|---|---|
Deletion date | The Send will be permanently deleted on the specified date and time. By default, seven days from creation. The maximum allowed value is 31 days from creation. |
Expiration date | The Send will expire on the specified date and time. |
Maximum access count | The Send will be disabled after the specified access count is reached. By default, unspecified. |
Password | Require a password to be entered by recipients of this Send in order to gain access. |
Notes | Enter private notes for this Send, which will only be visible to you. |
Hide my email address from recipients | Hide your email from Send recipients. |
Disable this Send so that no one can access it | Check this box to prevent this Send from being accessible to any recipients. You will still be able to interact with this Send from your Send view. |
tip
The rest of this section covers copying a send link to your clipboard, but you can do that automatically by checking the Copy the link to share this Send to my clipboard upon save option before you click Save.
Once you are happy your Send, select Save to finish.
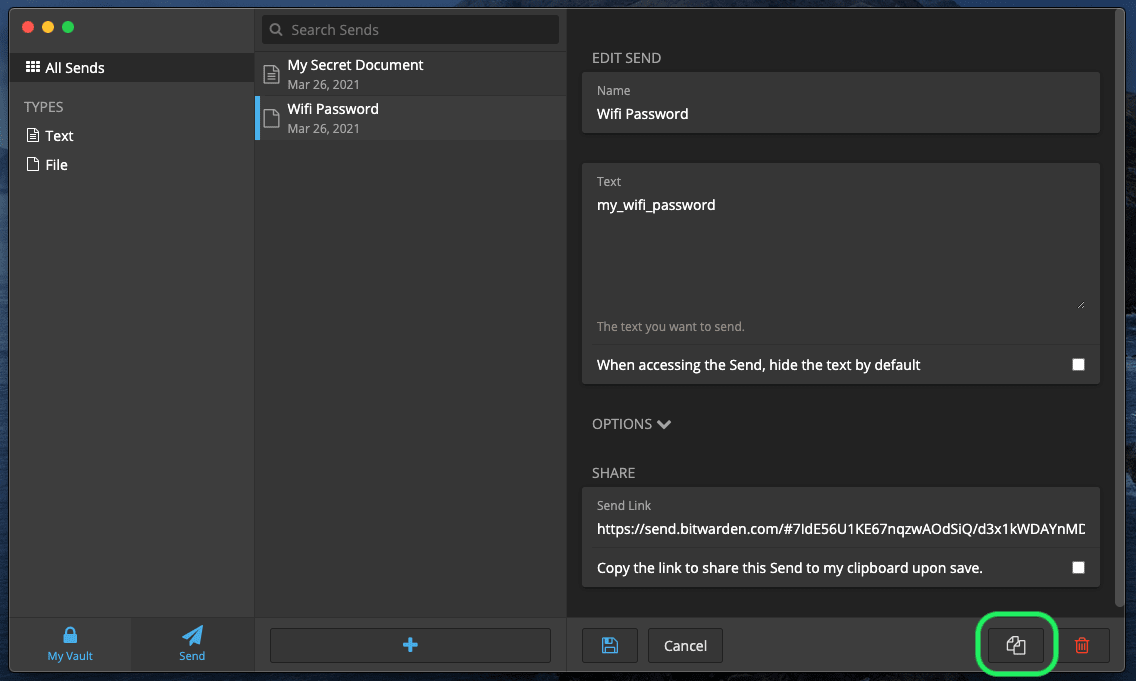
Once your Send is created, select the Copy Link button to copy the generated link to your clipboard:

Once copied, share your Send link with intended recipients however you prefer. Sends are end-to-end encrypted, so you don't need to worry about exposing any data to whatever intermediary communications services you use.
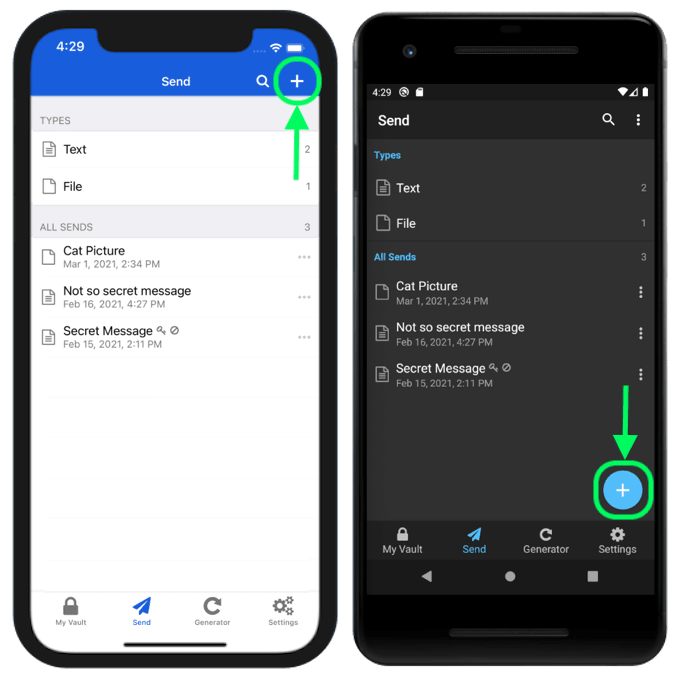
To create a new Send from a mobile app:
1. Tap the Send tab.
note
This view will list Sends that have not reached their deletion date. Like the Vaults view, you can filter your Sends by selecting one of the available Types.
2. Tap the Add icon:

3. On the Add Send view, specify the following:
Type: Choose whether this Send will be Text or a File:
Type | Steps |
|---|---|
Text | Type or paste the desired text into the input box. Toggle the When accessing the Send, hide the text by default option to require recipients to toggle visibility when they open a Send. Sends may not exceed 1000 characters encrypted. When saved, the character count of a Send's text is increased due to encryption, meaning that an 700-character Send will scale to ~1,000 characters when it comes into contact with Bitwarden, triggering this error. As a rule of thumb, character counts will grow between 30-50% when encrypted. |
File | Select the Choose File button and browse for the file to Send. The maximum file size per Send is 500 MB (100 MB on Mobile). (Requires Premium & Verified Email). |
Name: Choose an identifiable, meaningful name for this Send.
By default, a Send is scheduled for deletion seven days from its creation. You may change this and other options using the Options menu (see Step 4), otherwise tap Save to finish creating your Send.
4. Tap the Options menu to configure the following options as needed:
Option | Description |
|---|---|
Deletion date | The Send will be permanently deleted on the specified date and time. By default, seven days from creation. The maximum allowed value is 31 days from creation. |
Expiration date | The Send will expire on the specified date and time. |
Maximum access count | The Send will be disabled after the specified access count is reached. By default, unspecified. |
Password | Require a password to be entered by recipients of this Send in order to gain access. |
Notes | Enter private notes for this Send, which will only be visible to you. |
Hide my email address from recipients | Hide your email from Send recipients. |
Disable this Send so that no one can access it | Check this box to prevent this Send from being accessible to any recipients. You will still be able to interact with this Send from your Send view. |
Once you are happy with your Send, tap Save to finish.
Once your Send is created, tap the menu icon ( or ) and tap the Share Link option:

note
If you are using iOS, you can also share your send directly from the iOS Share Menu.
Share your Send link with intended recipients however you prefer. Sends are end-to-end encrypted, so you don't need to worry about exposing any data to whatever intermediary communications services you use.
The following are sample commands to help you get started using Send from the CLI. For more examples and help writing your own send command, we recommend reading Send from CLI.
To create a simple text Send with a deletion date set to 14 days from creation:
Bashbw send -n "My Text Send" -d 14 "My first secret message."To create a simple file Send with a deletion date set to 14 days from creation:
Bashbw send -n "My File Send" - d 14 -f /Users/myaccount/Documents/my_file.pdfSuggest changes to this page
How can we improve this page for you?
For technical, billing, and product questions, please contact support