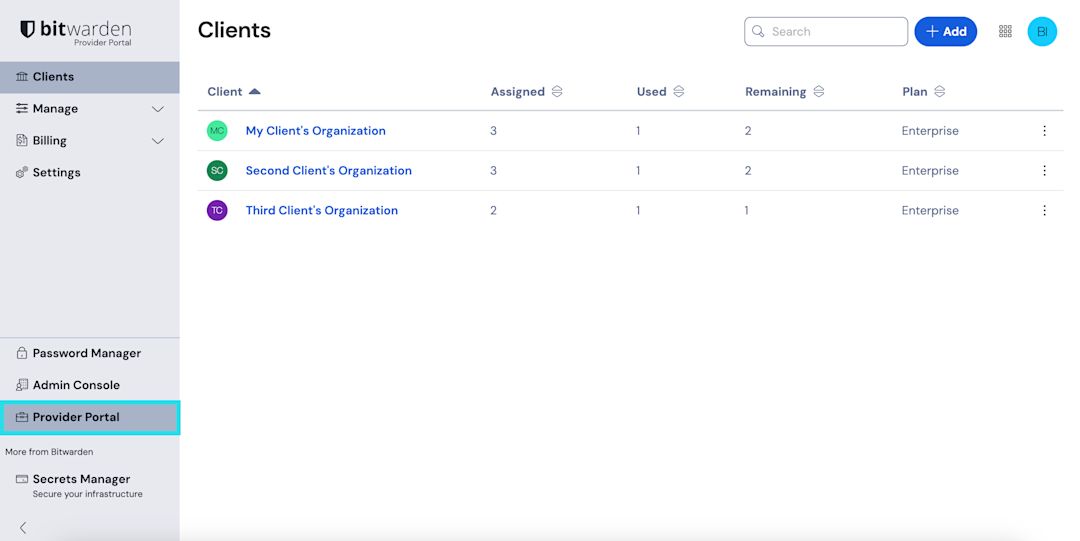
Start a Client Organization
This article will walk you through the creation of a client organization and outline a typical setup procedure for getting started administering a customer's organization.
Create a client organization
To create a client organization you must be a Provider admin:
Open the Provider Portal using the product switcher:
Product switcher - Provider Portal Navigate to the Clients tab of the Provider Portal and select Add → New client:
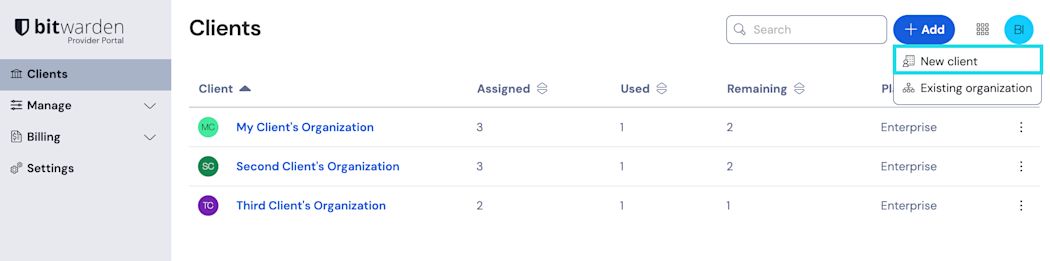
New client organization On the New client organization screen
Select whether to create a Teams or Enterprise organization.
Enter an Organization name, Client owner email, and Seats.
The amount of available unassigned seats, that is seats that you have paid for but aren't utilizing, will be shown on this screen. Should you go above this number, a number of additional seats purchased will be shown. Learn more.note
An invitation will automatically be sent to the Client owner email to join the organization as an owner.
Once you are happy with the organization, select Add organization.


Once created, navigating to the client organization from the Provider Portal will bring you to the organization vault, from which you can fully complete initial setup and engage in ongoing administration:

Initial setup procedure
With your newly-created client organization, you are ready to start building the perfect solution for your customer. Exact setup will be different for each client organization depending on your customers' needs, but typically will involve the following steps:
Create collections. A good first step is to create a set of collections, which provide an organizing structure for the vault items you will add to the vault in the next step.
Common collections patterns include Collections by Department (for example, users in the client's Marketing Team are assigned to a Marketing collection) or Collections by Function (such as users from the client's Marketing Team are assigned to a Social Media collection):

Collections Import data. Once the structure of how you will store vault items is in place, you can begin importing data to the organization.
note
Note that, as a provider user, you will not be able to directly view, create, or manage individual items.
Configure enterprise policies. Before beginning the user management portion of setup, configure enterprise policies in order to set rules-of-use for things such as master password complexity, use of two-step login, and admin password reset.
note
Enterprise Policies are only available to Enterprise organizations.
Setup login with SSO. If your customer uses single sign-on (SSO) to authenticate with other applications, connect Bitwarden with their IdP to allow authentication with Bitwarden using end-users' SSO credentials.
Create user groups. For Teams and Enterprise organizations, create a set of groups for scalable permissions assignment. When you start adding users, add them to groups to have each user automatically inherit the group's configured permissions (such as access to specific collections).
One common group-collection pattern is to create Groups by Department and Collections by Function, for example:

Collections Start inviting users. Now that the infrastructure for the secure and scalable sharing of credentials is in place for your client, you can begin inviting users to the organization. To ensure the security of the organization, Bitwarden applies a three-step process for onboarding new users, Invite → Accept → Confirm.
tip
If your customer uses directory service or IdP (active directory, an LDAP, Okta, and more), use SCIM or Directory Connector to automatically sync organization users from the source directory and automatically issue invitations.

